


Why are Before and After Photos Important in Aesthetics?
Whether you are an owner-operator or part of a larger clinic, before and after photos are a powerful tool for your clinic as they can show potential clients the results they could expect from your services.
Images are among the first things clients want to look at when considering aesthetic treatments, and this has never been more true – in an age of Google, Instagram, and TikTok, people are but a tap or click away from whatever images they want.
They say a picture paints a thousand words, so being able to take high quality, accurate before and after photos consistently is a powerful part of your toolkit to win new business in an industry that is as competitive as ever.
Why Should I Take Before and After Photos?
Beyond the promotional benefits of wowing potential new clients and winning new business, high quality treatment and client images serve other important functions for your business:
- Client management
Whether that is showing clients typical post-treatment reactions, highlighting their progress during courses of treatment, or assessing treatment results, high quality aesthetic images help you to manage your client at every part of their journey with you.
- Medico-legal
This includes recording pre-existing skin conditions and skin reactions, which are particularly useful for insurance reasons in cases of adverse reactions.
Do I Need Consent for Before and After Photos?
In a word? Yes!
If a person is identifiable from a photo, then it falls under the Data Protection Act (2018) and UKGDPR. So, it is best practice to have your clients give unambiguous, informed consent in written form before you take any photographs. Even if you anonymise the photo later, getting informed consent from every client is a good habit to get into.
The best way to do this is to have the client sign a consent form which explains why you are taking their photos, how you intend to use them, and providing the chance for them to opt-in to photos being used for marketing purposes.
It is worth remembering that under UKGDPR, clients have the right to withdraw their consent at any time, and you need to comply with the client’s wishes if they do.
If you need any further information around UKGDPR, we recommend visiting the Information Commissioner’s website, which contains a wealth of resources and guidance.
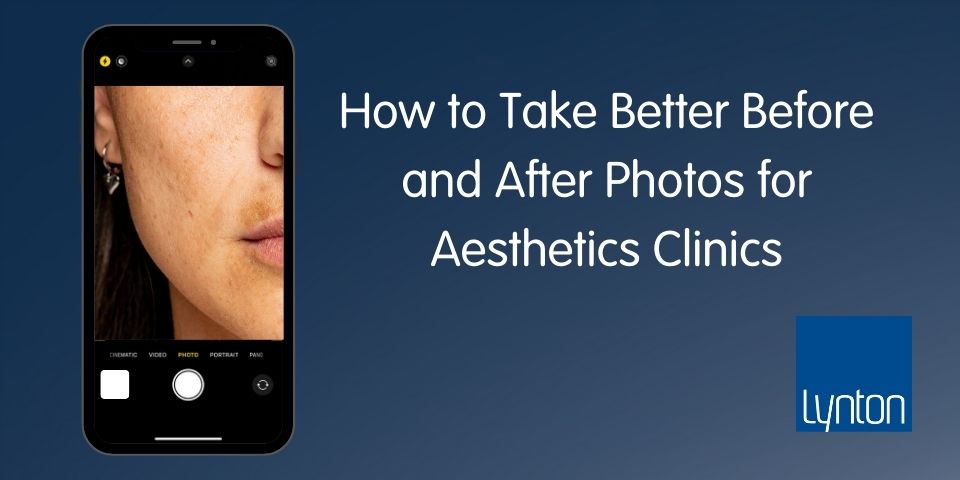
How do I Take Accurate and Effective Before and After photos?
The good news is that taking high quality before and after photos has never been more accessible for clinics of all sizes. Gone are the days when you had to invest huge sums of money into studio-grade equipment for taking accurate images. The power is literally in the palm of your hand, and a couple of inexpensive pieces of equipment and a few bits of knowledge are all that stands between you and better before and after photos.
Equipment
- Camera – A DSLR Camera is still the gold standard for taking effective before and after photos, but it is no longer essential. Most smartphones come equipped with high-quality cameras (particularly at the top end) that can deliver excellent results for you.
- Tripod – Stabilising your camera is best practice, no matter the position of your client when taking photos, and this can be achieved with a simple tripod and phone mount. Good tripods can be found inexpensively. For smaller clinics where space is at a premium, you might find a monopod serves you better.
Are you shooting your before and afters on a mobile device? For more tips and guidance, watch our webinar with Lynton Clinical Director Dr Sam Hills, all about taking better before and after photos, where we talk specifically about getting the best out of your smartphone.
Lighting
No matter what kind of camera you are using, lighting is the single most important factor to consider when taking photos. This is especially true if you are using a smartphone, because many of your settings are automatic and controlled via software.
Natural light is best, but this may not be an option for all clinics. In these cases, an overhead light that is reflected off the walls achieves good results. It is important to have the same lighting in all your photos, so that your images are consistent.
We do not recommend using the flash on a smartphone if it can at all be helped, as it can wash out the skin and risk being detrimental to the results you are trying to show.
Environment
Angles – You need to shoot the same angles (including the position of the client) each time you take image to ensure you are showing the treatment area clearly and consistently.
Distance – Ensure you are the same distance from the client each time you take a photo. A good way to help this along is by marking your floor with tape to show where you and the client stand. If you are using a mobile device, try not to use the zoom, as this diminishes the quality of your photos significantly.
Background – White backgrounds are best, such as a white wall. It is also important to ensure there is no clutter in the background of your shot (like a device, products, or other clinicians!), as they will distract from what you are trying to show.
Consistency
Consistency is the key to mastering the art of before and after photos. Just like any other clinical skill, before and after photos are something you can practice, so take the time to practice, and you will keep getting better.
A great way to achieve that consistency is to turn taking your before and after photos into a documented business process that you stick to each time. If you are an owner-operator, it gives you a process to follow each time, but if you are part of a team, it is a useful tool for training new clinicians in taking images.
How Should I Edit My Before and After photos?
You should edit your before and after photos as little as possible. The use of filters or other enhancement tools is something we advise against, because you run the risk of misrepresenting your results. This alone can be catastrophic for the credibility of your business.
Sometimes you may need to crop and zoom photos a little to highlight the treatment area and results, but we would say that the focus needs to be firmly on capturing the best, most accurate photos you possibly can.
There is a variety of apps and tools for putting your before and after photos together for display on social media and your website.
Among our favourites is Canva. It has a fantastic free version that you can use to design graphics for your social media accounts, websites, and much, much more. You can also use it to watermark your before and after photos as well as anonymising your clients if that is something they have asked for.
Closing Thoughts
Before and after photos are not only a testament to the transformative results you can achieve, but also serve as powerful marketing tools to attract new clients and build trust with your audience.
A working knowledge of capturing accurate and effective images is a great skill for any aesthetic practitioner to have, and by implementing the tips and techniques discussed above you can make great strides towards taking your aesthetics photography to new heights. This will resonate with your target audience and set your business apart in a competitive industry.
For a more detailed discussion of before and after photos, take some time to watch our webinar, “Picture Perfect – A Guide to Better Before & Afters”, which is available on demand on YouTube.